My current cooking pot is the Vargo BOT 900. I like multi-use items. I use the BOT for cooking, as a water bottle, and to make Mitten Shakes for breakfast. Since my pot is in use all day, I needed some type of container for my alcohol stove kit. There were, of course, requirements. It needed to fit all of my stove kit. This included the following:
- Trail Designs Kojin Stove
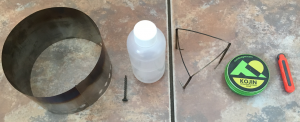
- Trail Designs Fuel Bottle
- QiWiz Tri-Stand (pot stand)
- QiWiz Small Titanium Wind Screen
- Spark-Lite Sparker
- a small sheetrock screw for removing the restrictor from the fuel bottle
Weights for these items and the rest of my kit can be found on my lighterpack page.
If room to fit all of that was the only requirement, that would be easy, a stuff sack would do, but there were more requirements.
- It had to hold the fuel bottle upright. I hate always wondering if my fuel cap it on tight enough to prevent leaking.
- If the fuel bottle were to leak the case needed to prevent the fuel from getting all over everything in my pack. In reality, I have never had a fuel bottle leak, but in my imagination it happens frequently.
- It had to be hard sided to offer some protection both for the stuff inside the case and outside.
- It had to fit the QiWiz Tri-Stand in its assembled position. Earlier attempts at carrying the stand proved it needed to carried so that other items were not banging into it while folded to avoid bending. Carrying it assembled was my solution.
- It had to be multipurpose.
- It had to weigh less than a vampire’s reflection.
- It would be nice if it was cheep.
I’m not sure if any other hobbyist besides backpackers go into the water aisle in the grocery store looking only at the characteristics of the container and ignoring the contents. Ultralight backpackers can tell you the weight of the empty bottle, the thread size of the cap, and the long-term durability of various plastic bottles. Ultralight backpackers know what containers serve what repurposing. (If you ever find one of my Voss water bottles, don’t drink out of it).
When I am in the water aisle of the grocery store, I am not looking to see what vitamins, minerals, and pixie dust the water is fortified with. I’m looking at the containers. The first trip to find the perfect container was soon aborted. I realized I needed to know the diameter of the assembled pot stand.
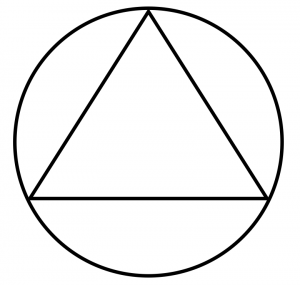
Now, I could have just brought the stand into the store and compared it to the the diameter of the bottom of the bottles to find a good fit, but that would have avoided a good intellectual challenge. How could you calculate the diameter of a circle needed to contain an equilateral triangle, when only the length of the sides of the triangle were known?
My love for logic puzzles lead me to believe I could overcome my lack of math skills in solving this problem. I tried, off and on, over a few weeks to figure out what the formula would be. No joy. So, I “googled” it. Without using Google, of course. I avoid using Google every chance that I get. I still cling to the utopian notion that privacy can still exist.
It turns out this is called a circumradius. The formula for a circumradius of an equilateral triangle is s/√3 or s over the square root of three, where s is the length of on side of the triangle.
Now with this knowledge I could return to the water aisle of the grocery store. With math on my side, I would not need to look like a fool comparing my pot stand to the bottom of various water bottles, instead I could look hip and cool pulling out my 25 foot tape measure to measure the bottoms of said water bottles.
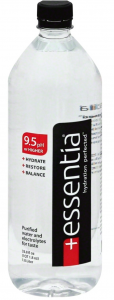
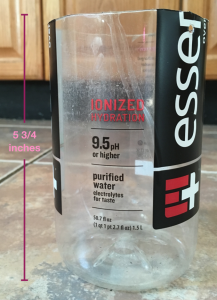
SPOILER ALERT. For those of you who do not wish to be robbed of the pleasure of this process, read no further. The type of water bottle which works will now be revealed. The water bottle I found which works is the 1.5 liter sized essentia water bottle.
For those of you interested in the contents and not the container, the water has a ph of 9.5 or higher. Apparently, it has “electrolytes for taste.” To be honest, it tasted like water to me. I did not find that I could hike longer, run faster, or think more clearly after drinking it. But now with an empty bottle, I could go to work.
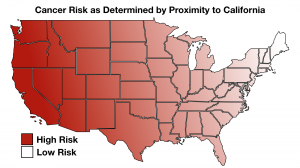
I had found from earlier projects that a hot knife cuts well through a plastic bottle and leaves a less sharp plastic edge. Be warned, I am certain that the fumes from this process are known to cause cancer in California. Fortunately, I live in Maine, which is so far from California that the cancer risks are almost entirely mitigated.
My first cut was 5 3/4 inches from the bottom.
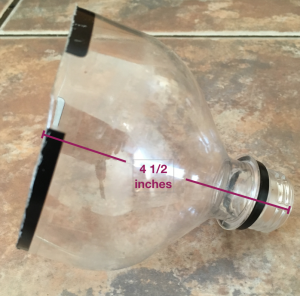
Next, I measured from the cap down 4 1/2 inches. I had to cut a vertical one inch slit on the bottom of this top part so that the diameter could be reduced just enough to fit into the bottom portion.
You can see that my cuts are jagged and uneven. That’s just the way we cut things here in New England. Think about the sleeve on a famous football hoodie.
Then, I heated a nail and melted two holes, opposite each other, on the bottom section, near the top of the first cut (see warning above).
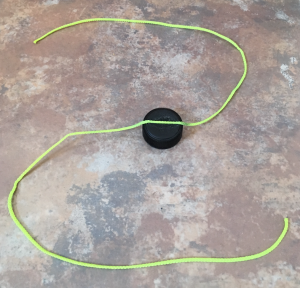
I roughed the top of the cap with a knife, or a nail, or a rock, or my teeth. I really don’t remember. See, when working on a project like this, bottled water isn’t my beverage of choice.
With the top of the cap rough, I used some type of super glue, to glue about two feet of bank line to the top of the cap. Then by threading the line through the two holes and using a barrel lock, the container can be closed.
The kit goes together like this.
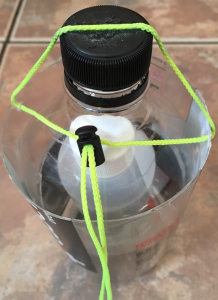
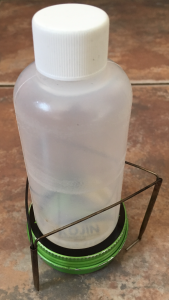
The windscreen goes in first. Next the stove and assembled pot stand. It turns out that the Trail Designs fuel bottle fits snuggly into the QiWiz Tri-Stand. This helps to hold fuel bottle upright.
The Spark-Lite and small screw are then dropped in. When the top of the container is added, the narrower diameter of the cap end also helps keep the fuel bottle upright.
I know that some of you in the ultralight community are cringing at the fact that the bottle still has the label on. I know grams add up to tons and tons are hard to carry. I can proudly claim many different kinds of craziness. Removing labels is a type of crazy I am saving for a later point in life. One needs goals to aspire toward!
As for multipurpose, the top and bottom portions can be used as water scoops at shallow water sources. The cap can be removed from the top portion and be used as a funnel. Finally, the cap can be removed from the top portion. The bank line can be threaded up through the opening. Then a food bag line can be threaded through the opening. This provides some mouse protection for the food bag. Mice can climb down the line, but slide and fall off of the smooth plastic preventing them from reaching the food bag.
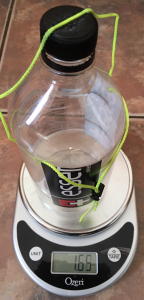
The container weighs 1.65 oz. Which, as it turns out, is about 1.66 oz heavier than a vampire’s reflection, but this container meets all of my other requirements. It has served one whole backpacking season without damage or signs of wear.